There are plenty of tutorials explaining how to setup Subversion on a Windows machine. Not so many good tutorials on how to actually use Subversion in the real world. In the rel world you sometimes need to apply Subversion to a bunch of files and folders that already exist. Applying Subversion to an already existing directory is more obfuscated than it needs to be. The user manual would have you believe that you need to Import, delete the directory, do a Checkout.
But what if you don’t want to Import all files and sub-folders? It’s the kind of thing you need to do very rarely, but when you do, it’s always a pain to remember exactly the best way to go about it. But it’s actually pretty simple: the key is to use SVN Add files rather than the SVN Import functionality.
The Approach
Your best bet is to apply version control to the highest level directory that you can. That way placing additional files under version control is a simple matter of Adding new files – no need for Importing, Checking out.
These instructions assume your using Subversion, and the Windows based TortoiseSVN graphical interface. The process from the command line follows the same steps though.
The example below assumes that you have a top level folder \MyProjects\ which contains a bunch of other folders and files that you want under version control.
Create a repository
Only required if you don’t already have a repository that you can use. Either create a new folder that’s going to hold all repositories, or create something at the same level as the project folder, just for this folder.
- In this case create a folder called
\MyProjects.svn\. - Right click on the new folder and select “Create repository here”.
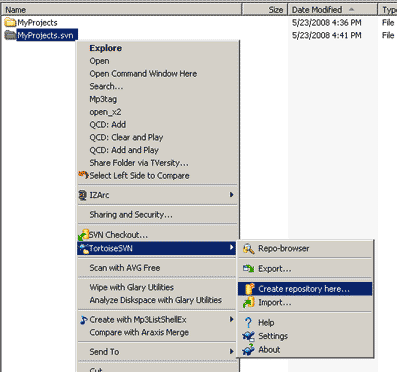
- Choose "Native filesystem (FSFS)
You should now have a folder \MyProjects.svn\, with a bunch of Subversion folders inside.
Create trunk, tags, and branches folders
This is not strictly necessary, but it’s easy to do, and helps you manage tags and branches later if you choose.
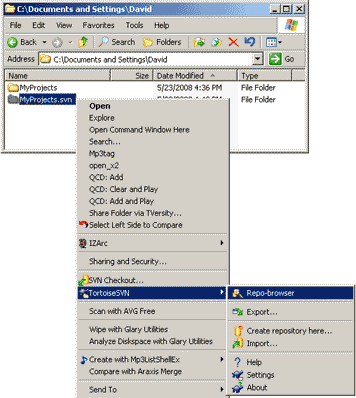
- Right click the Subversion repository folder
\MyProjects.svn\, and select “Repo browser” from the Subversion menu.
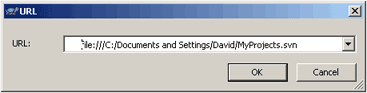
- Enter the url of the Subversion repository you just created. In this case:
file:///C:/Documents and Settings/David/MyProjects.svnNotice the forward slashes, and thefile:///prefix.
- Right click the top level folder in the Repo Browser, and select “Create folder”.
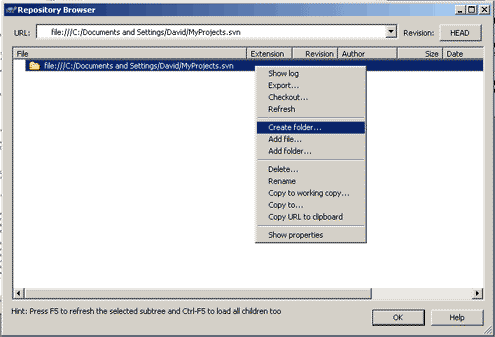
- Do this three times for “trunk”, “branch”, and “tags”.
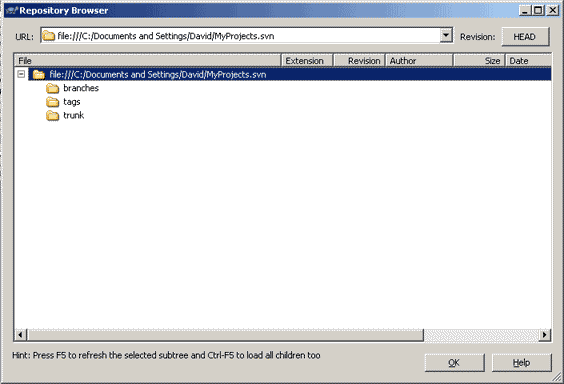
- Close out of the Repo Browser.
Rename the existing project folder
Do this on the highest level folder you can. If you want to keep the name of your top-level folder, we’ll have to temporarily rename it, as we need to do an SVN Checkout.
- Rename the folder
\MyProject\to something like\MyProjects.sav\.

- Create an empty folder with the name of the original project folder:
\MyProjects\
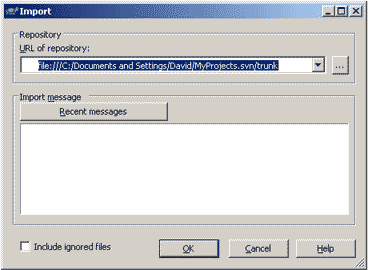
Import the new empty folder to trunk
- Right click the
\MyProjects\folder and select Import. - Select the correct URL from the pull-down, and add
/trunkat the end to getfile:///C:/Documents and Settings/David/MyProjects.svn/trunk/.
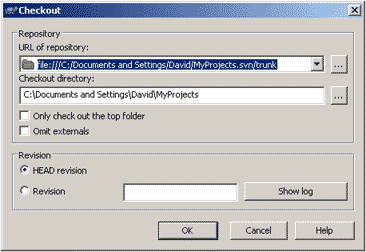
Checkout the empty folder
This step is critical – don’t miss it!
- Right click the empty folder and select SVN Checkout. You should now see a .svn folder inside
\MyProjects\.
Copy original files to new folder
Copy the original folder and files into the now version controlled \MyProjects\.
- Select everything inside
\MyProjects.sav\, and copy into\MyProjects\.
Add files to Subversion
The next part really depends on what you want to add to version control. If you want to version control most of the \MyProjects\ folder, simply select all the directories inside \MyProjects\, right click and select “Add…”. Then pick and choose the file and folders you want version controlled.
If you want to add only a few sub-folders to version control then simply select those folders, right-click and select “Add…”.
Commit
Final step as always is to Commit.
- Right click
\MyProjects\and select SVN Commit.